

Mastering the Text Behind Subject Effect in CapCut: The Definitive Guide
The landscape of digital video production is constantly evolving, and the ability to create dynamic and engaging visuals is crucial for capturing and retaining viewer attention. One of the most impactful and popular visual effects today is text elegantly positioned behind the presenter or main subject. This effect, which adds depth and professionalism, transforms a simple video into a cinematic experience.
While it may seem complex, achieving this visual depth in CapCut—one of the most accessible and powerful editing software tools available today—is surprisingly straightforward, provided the correct workflow is followed. This detailed guide reveals the most practical, fastest, and most efficient technique for applying the text-in-the-background effect, ensuring your message is delivered with maximum visual impact. We will explore every step, from preparing the timeline to the final background removal adjustments.
The secret to this effect lies in manipulating the layer hierarchy and surgically removing the background from the main subject. By positioning the text between the video layer containing the presenter (with the background removed) and the original video layer (serving as the background), we create a perfect illusion of depth. Precise execution, however, requires attention to detail, especially in synchronizing the text with the speech and choosing the most appropriate background removal method for your source material.
Timeline Preparation: Cuts, Synchronization, and Flow
The foundation of any good edit is a clean and organized timeline. Before diving into visual effects, it is crucial to prepare the source material. The video must be segmented to perfectly align the text with the exact moments of speech, ensuring the visual information complements the auditory message without delays or misalignment.
The Importance of Precise Cuts and Removing Silences
The first step in editing is performing the necessary cuts. This not only sets the video’s pace but also isolates the sections where the background text will be applied. An essential practice, as demonstrated in the technique, is removing “empty sound segments”—moments of silence, breathing, or hesitation. Fragmenting the video into smaller clips (in this case, four parts) makes time management easier and ensures precision when inserting graphic elements.
- Identification: Listen carefully to the audio to identify the exact points where the keywords will be mentioned.
- Segmentation: Use CapCut’s cutting (split) tool to divide the main clip.
- Cleaning: Remove unwanted audio sections or prolonged silences to maintain a cohesive and dynamic narrative flow.
This meticulous preparation ensures that when we later duplicate the layers, we will have short, manageable video segments that directly correspond to the text display time.
Inserting and Customizing Text Elements
With the base video properly segmented, the next step is to insert the texts that will be placed in the background. These texts must be large, crisp, and strategically formatted to be easily readable, but without visually competing with the presenter.
Adding and Synchronizing Key Texts
CapCut provides an intuitive interface for adding text. By clicking the Text option, a new text clip is added to the timeline, usually on a layer above the main video. For our example, the keywords were “Prático” (Practical), “Simples” (Simple), and “Rápido” (Fast).
Synchronization is vital. Each text must appear precisely when the corresponding word is spoken. If the video was well-segmented in the preparation phase, simply adjust the duration of each text clip so that it covers the relevant video segment. An efficiency tip is to create the first text (“Practical”), format it, and then use the copy and paste function (Ctrl+C, Ctrl+V) twice. This ensures that the other texts (“Simple” and “Fast”) inherit the same formatting, saving time.
In addition to the main texts, it is common to add secondary text to contextualize the effect, such as “Text Effect.” This text, being more descriptive, can have a smaller font size, ensuring the screen is not visually cluttered.
Choosing the Font, Size, and Color
Visual customization is crucial for the legibility of the text-in-the-background effect:
- Size: Background texts should be large enough to fill the space behind the presenter, often occupying a significant portion of the screen.
- Font: Thick fonts (bold, sans-serif) are generally preferred because they maintain clarity even when partially obscured by the presenter.
- Color and Contrast: It is essential to choose a color that contrasts well with both the presenter and the original background. Light or vibrant colors work well, especially if the background is dark or if CapCut adds a slight shadow to the text.
It is highly recommended to define the formatting (font, size, color) on the first text and apply it as a preset for all subsequent texts. This ensures visual consistency throughout the entire edit.
The Masking Secret: Layer Duplication and Hierarchy
We arrive at the crucial point of the technique: creating depth through layer manipulation. CapCut, like most modern editing software, works with a system of stacked tracks, where the top track is always displayed over the lower tracks.
Duplicating the Base Material
To create the “text behind” effect, we need three distinct elements stacked in the correct order:
- Layer 1 (Bottom): The complete original video. This layer will serve as the background.
- Layer 2 (Middle): The text clip we want to position behind the presenter.
- Layer 3 (Top): An exact copy of the original video, but with the background completely removed.
The process begins by copying and pasting the video segments (the four segmented parts) directly onto the track above. If the original videos are on track V1, the copies should be moved to track V3 (assuming the texts are on V2). This duplication must be done for all segments that will feature the text-in-the-background effect. It is vital that each copy is perfectly time-aligned with its original on the bottom track.
The Magic of Background Removal
The top layer, which contains the presenter, is the key to the effect’s success. This is where the background removal will be applied. By removing the background from this top layer, only the presenter remains visible. Since the text (Layer 2) is immediately below, it is displayed, and then the presenter (Layer 3) is placed over it, creating the illusion that the text is behind.
CapCut’s Background Removal Options
CapCut offers three main methods for isolating the subject from its background. The choice of the ideal method depends on your source material and access to Pro features.
1. Automatic Removal (AI-Based)
Generally available to Pro version users, this method uses Artificial Intelligence to automatically detect and isolate the main subject (the person) from the background. It is the fastest and most efficient method, requiring little to no manual intervention. It is ideal for complex backgrounds or situations where lighting is not perfect.
2. Chroma Key
If your video was recorded against a solid, uniform color screen (usually green or blue), Chroma Key is the most precise and cleanest method. The editor selects the background color, and the software makes it transparent. It is the industry standard for background removal and results in extremely crisp edges, but it requires proper preparation during filming.
3. Custom Removal (Manual Masking)
For users who do not have the Pro version or for videos recorded without a Chroma Key background, Custom Removal (or manual masking) is the alternative. This method is more labor-intensive but ensures the effect can be achieved by anyone.
Detailing Custom Removal
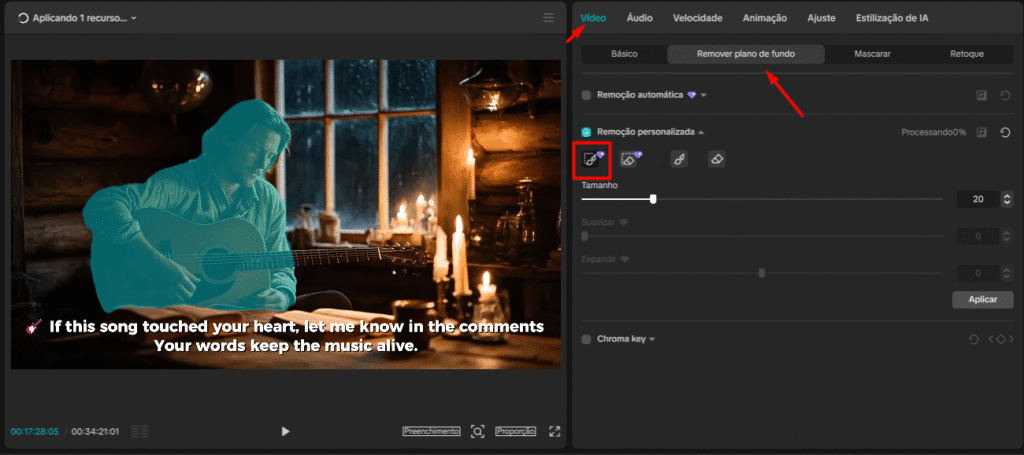
Custom removal requires the editor to draw a mask around the object they wish to keep. In CapCut, this involves:
- Tool Selection: Activating the Custom Removal function.
- Initial Drawing: Using the selection tools to outline the presenter’s contour. The software attempts to fill the subject based on your initial drawing.
- Refinement with the Smart Eraser: This is the crucial step. If the software includes unwanted elements (such as a guitar, a chair, or part of the set), the editor must use the “smart eraser” tool to remove those specific areas.
The goal is to ensure that when the bottom video track is “hidden,” only the presenter remains on the screen, with the background completely transparent. This process requires patience and precision, especially if the presenter moves a lot, as the mask might need to be adjusted (using keyframes) to follow the movement, although in many static cases, an initial selection is sufficient.
Finalizing the Effect and Visual Hierarchy
Once the layers have been duplicated, the texts inserted, and the background of the top layer successfully removed, the effect is complete. The text, which was previously in front of the presenter, now magically appears behind them.
The Layer Order in Action
To reiterate, the stacking order is what dictates the visual magic:
- Top Track (V3): Isolated Presenter (Transparent Background).
- Middle Track (V2): Text (Practical, Simple, Fast, etc.).
- Bottom Track (V1): Original Video (Complete Background).
The viewer sees the presenter (V3), which allows the text (V2) to be seen through its transparent background. Below everything, the original video (V1) fills the remaining space, ensuring the background is not simply black or empty.
A quick visualization test, temporarily hiding track V3, confirms whether the background removal was successful. If the area behind the presenter turns black or gray (depending on CapCut settings), it means the subject has been correctly isolated.
Professional Insights and Practical Applications
This effect is not just a visual trick; it is a powerful communication tool. Its application goes beyond editing tutorials and extends to various forms of content, always aiming to enhance retention and engagement.
When to Use Text in the Background
The effect is particularly effective in:
- Educational Vlogs and Tutorials: To highlight keywords, statistics, or complex concepts being discussed.
- Marketing and Launch Videos: To display product titles or impactful phrases in a grand and professional manner.
- Video Introductions: To present themes or the content agenda dynamically and engagingly.
Tips for Optimization and Legibility
While the effect is visually stunning, legibility must be the priority. If the text is difficult to read, it fails its purpose. Consider the following points:
- Contrast: If the presenter is wearing vibrant colors, ensure the text does not blend with the clothing.
- Negative Space: Position the text in areas of the screen where the presenter’s movement is minimal. If the presenter moves too much, the text may become completely obscured or appear visually “shaky.”
- Subtle Animation: Although not covered in the basic technique, adding a subtle entrance and exit animation (fade in/fade out) to the texts can smooth the transition and enhance video flow.
Mastering the background removal technique, whether through Chroma Key or manual masking, is the differentiator that separates amateur edits from professional productions. Investing time in the precision of the mask on the top layer is what ensures the depth effect is flawless.
Conclusion
The text-behind-subject effect is an advanced yet accessible editing feature that instantly elevates the quality of any video production done in CapCut. By mastering layer manipulation—duplicating the video, inserting the text in the intermediate position, and removing the background from the top layer—editors can create a visual depth that captures attention and reinforces the message.
This simple yet powerful technique demonstrates CapCut’s potential as a professional editing tool. The key to success lies in the precision of the cuts, the consistency of text formatting, and the meticulousness of background removal. By applying these steps, any content creator can transform their editing, moving away from flat videos and adopting a visually rich and dynamic aesthetic.
See the full vídeo below: