

The Magic of Transformation: Elevating 480p Videos to 4K Quality Using CapCut
In a world where visual quality reigns supreme, the difference between a low-resolution video and Ultra HD content can be the key to engagement. Imagine the frustration of having valuable footage limited by 480p resolution—blurry, lifeless, and lacking in detail. Now, visualize that same scene, but vibrant, sharp, and possessing the depth that only 4K can offer. This transformation isn’t magic; rather, it’s the result of an advanced, multi-layered technique utilizing CapCut’s powerful tools to simulate and significantly enhance visual quality.
This article details a professional, step-by-step workflow that goes far beyond simple upscaling. It is a strategic combination of sharpening filters, perceptual detail enhancement, subtle chromatic correction, and the intelligent use of Artificial Intelligence-driven enhancement features. If you are looking to resurrect old videos or simply add a professional polish to low-quality footage, this methodology, broken down into clear and deeply developed stages, is essential.
The process we will explore uses the concept of non-destructive editing and the creation of composite clips, ensuring that every applied effect works in harmony with the next, culminating in a surprising final image that closely approximates native 4K clarity.
1. Preparation and the Foundation of Sharpness (Sharpen Edits)
The first challenge when working with low-resolution videos is restoring the edge information lost through compression and the lack of pixels. This is where the sharpening effect comes into play, but it must be applied with surgical precision to avoid unwanted digital artifacts, such as halos or excessive noise.
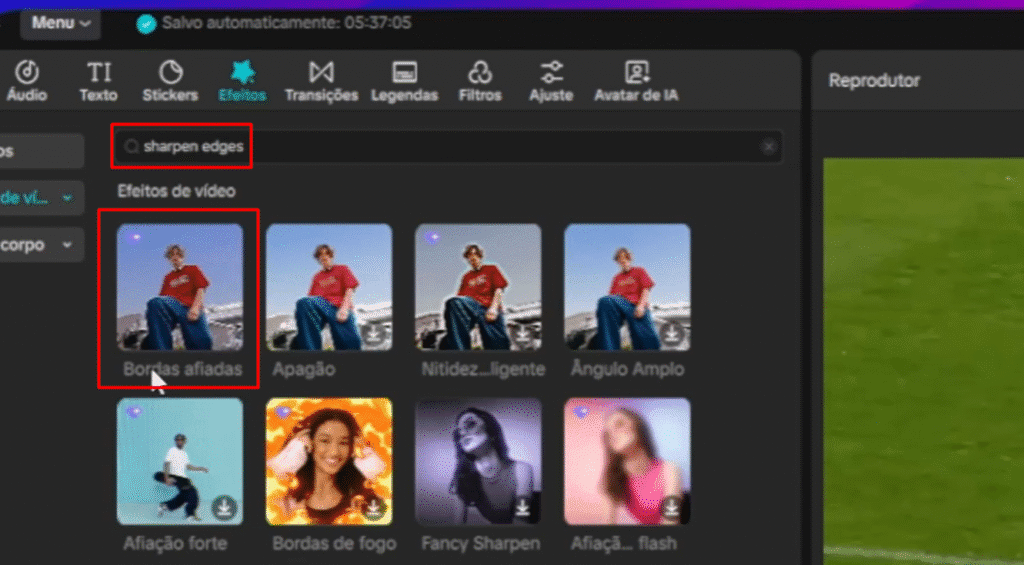
1.1. Importing and Initial Effect Application
The process begins simply: import your low-resolution video (480p) into the CapCut timeline. This is our starting point. Next, access the Effects panel and search for “Sharpen Edits” (or “Bordas Afiadas” if your software is in Portuguese). Drag this effect onto the timeline, ensuring it covers the entire length of the clip to be enhanced.
The initial application of this filter is crucial because it begins to define the contrast around the edges of objects, a fundamental step in deceiving the eye and preparing the upscaling software we will use later.
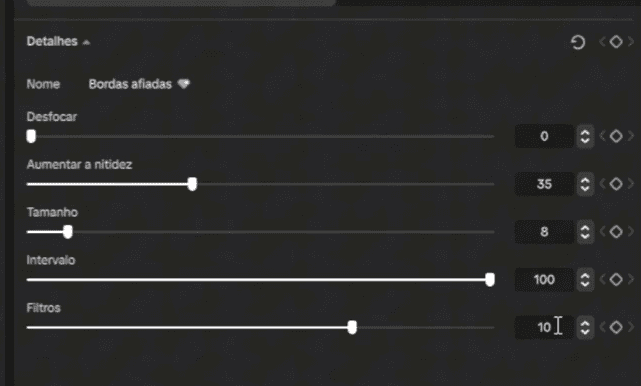
1.2. Configuring the Sharpness Parameters
Adjusting sharpness parameters requires balance. The goal is not just to increase sharpness, but to eliminate the inherent blur of 480p footage and introduce controlled definition:
- Blur: Should be set to 0. We want to ensure the filter does not add any unwanted softening, focusing purely on sharpness.
- Sharpness: Adjust to 35. This is a robust initial value, providing a good starting point for edge definition without immediately introducing excessive noise.
- Filter (Radius): Set to 10. This parameter controls the radius of the sharpening effect’s action. A low value (like 10) helps keep the sharpness more localized to the edges, minimizing the chance of creating visible halos around objects, a classic sign of over-sharpening.
This initial adjustment layer is the foundation that transforms the hazy image into something with recognizable structure.
2. Strategic Duplication and Perceptual Detail Enhancement
A single sharpening filter may be insufficient to simulate the rich detail of 4K resolution. To create an illusion of depth and high-frequency texture, we need a second layer of enhancement, focused on fine details.
2.1. Duplicating the Base Effect
Duplicate the Sharpen Edits layer you just configured. This stacking of effects allows the second filter to act upon the already pre-processed image, intensifying the result.
2.2. Introducing ‘Boost Nets’ (Aumentar Nets)
In the second duplicated effect, the focus shifts to texture perception. Look for the “Boost Nets” setting (or a similar term CapCut uses for fine detail enhancement) and set it to 10. Concurrently, adjust the Size parameter also to 10.
The ‘Boost Nets’ feature functions as a micro-contrast enhancement. By working in conjunction with the general sharpness of the first effect, it simulates the presence of fine details—such as the texture of skin, fabric, or grass—that were lost in the original low-resolution footage. This layering technique is key to simulating high definition.
3. Adding Depth and Style with the Chromatic Effect
4K videos, especially those captured with high-quality lenses, often exhibit subtle optical characteristics. One such element is Chromatic Aberration (CA), which, when controlled, can add a sense of depth and a cinematic touch to the video.
3.1. Applying the Chromatic Filter
Return to the Effects panel and find the “Chromatic” filter. Drag it onto the timeline, stretching it to cover the entire clip. This filter introduces a slight color separation (known as ‘fringing’) at high-contrast edges, simulating the optical imperfections often associated with professional cameras.
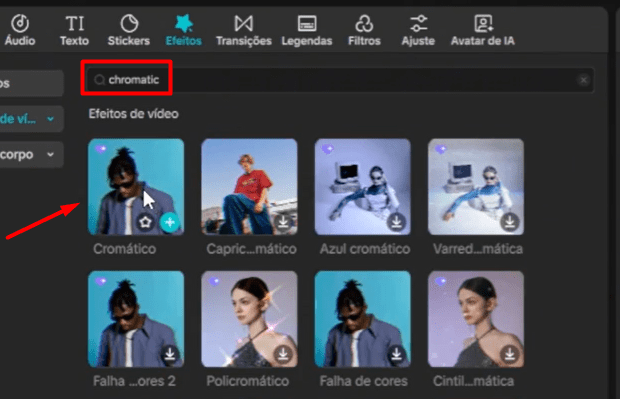
3.2. Configuring the Chromatic Adjustment
The adjustments here must be subtle, as excessive use of chromatic aberration can look like an error rather than an intentional effect. The recommended settings are:
- Speed: 15
- Strength: 20
- Color Difference: 25
These values ensure the effect is noticeable enough to add character and depth, but not so strong as to distract the viewer. It contributes to the feeling that the video was captured with a high-quality lens.
4. The Concept of Composite Clips and Non-Destructive Editing
At this point, we have applied three layers of effects. To ensure that the next steps (Glow and upscaling) act upon the final, combined result of these adjustments, and to maintain a clean workflow, we need to consolidate the work.
4.1. Creating the First Composite Clip
Select all the clips and effects applied so far (the base video, the two Sharpen Edits layers, and the Chromatic effect). Right-click (or use the equivalent function) and choose “Create Composite Clip” (or “Clipe Composto”).
The Composite Clip transforms this stack of adjustments into a single object on the timeline. This is crucial. First, it organizes the project. Second, it allows subsequent global effects to be applied more cleanly and efficiently, treating the result of the sharpness and chromatic correction as a new video source.
5. Softening the Image with the Glow Filter
A side effect of aggressive sharpening is that the image can appear overly digital and harsh. To counteract this and add a high-level production touch, we introduce the Glow filter.
5.1. Applying and Configuring the Glow Filter
Search for the “Glow” filter and drag it onto the newly created Composite Clip, extending it for the entire duration. This filter softens the highlights and slightly diffuses the image, creating a halation effect that is often associated with cinematic productions.
Adjust the Glow Intensity to 50. This level provides a noticeable bloom that helps blend the edges excessively defined by the sharpening, giving the image a more organic and polished finish, essential for the 4K illusion.
6. Final Consolidation and AI Ultra HD Enhancement
With the image now properly prepared (sharp, with enhanced perceptual details, and softened by the Glow), we are ready for the most important step: the actual upscaling, performed by CapCut’s artificial intelligence.
6.1. The Second Composite Clip
After applying the Glow filter, it is vital to create a second Composite Clip. This ensures that the AI upscaling engine will process the final image (sharpness + chromatic + glow) as its input, drastically optimizing the final result.
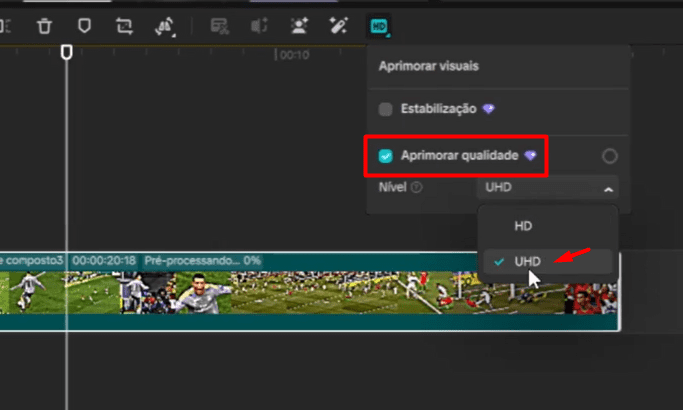
6.2. Activating Ultra HD Quality Enhancement
Select the second Composite Clip. Go to the quality or enhancement settings (often labeled as HD or Quality). Click “Enhance Quality” and select the “Ultra HD” option.
This feature uses AI-based super-resolution algorithms to fill in missing pixels and reconstruct the image at a significantly higher resolution. Because we prepared the image with sharpening and noise reduction before this step, the AI has much clearer edge and texture data to work with, resulting in superior upscaling with fewer artifacts than if we had applied Ultra HD directly to the original 480p video.
7. The Final Polish: The Dedicated 4K Filter
After the Ultra HD enhancement process is complete (which may take a few seconds depending on hardware and video length), CapCut temporarily exports or renders the result. We are almost there, but a final look adjustment is needed.
7.1. Applying the Specific 4K Filter
Go to the Filters section and look for specific resolution enhancement options, often labeled simply as “4K” or “Enhance” within the quality filter categories.
Apply this filter to the timeline, above the final Composite Clip. This filter generally acts as a post-processing preset, subtly adjusting saturation, contrast, and micro-sharpness to give the typical finish of a high-resolution video.
7.2. Fine-Tuning the Filter
Adjust the intensity of this filter to 50. This ensures it complements the adjustments already made rather than overpowering the image. The result is a video that not only has the pixels of a higher resolution (thanks to the AI Ultra HD) but also the look and visual feel of a 4K production.
8. Analysis and Insights into Multi-Layered Upscaling Editing
The effectiveness of this method lies in the combination of manual and automatic techniques. Simply using CapCut’s Ultra HD tool on 480p footage often results in an artificial and noisy image. The secret is in source preparation.
8.1. The Importance of Pre-Sharpening
By applying the Sharpen Edits and Boost Nets layers, we are essentially ‘pre-processing’ the image, reducing blur and highlighting edges before the AI takes action. This provides the AI with clearer information about where lines and textures should be reconstructed, minimizing the creation of compression artifacts.
8.2. The Role of Style Effects (Chromatic and Glow)
Chromatic and Glow effects do not increase resolution but enhance perceived quality. Chromatic adds a sophisticated optical touch, while Glow combats the digital harshness introduced by sharpening, resulting in a final look that appears more expensive and less amateurish. It is a visual perception trick that elevates the upscaling result.
8.3. Workflow Management with Composite Clips
Composite Clips are the backbone of any complex edit. They ensure that the order of effects is respected and that global enhancement tools (like Ultra HD) act upon the accumulated result of all previous adjustments. Without consolidation, applying Ultra HD might only enhance the base video, ignoring the sharpness layers, resulting in ineffective work.
Conclusion: The Art of Content Revitalization
Transforming a 480p video to the visual quality that simulates 4K in CapCut is a testament to the power of strategic editing. It is not just about increasing the pixel count, but about manipulating visual perception through a careful sequence of sharpness, detail, style, and artificial intelligence enhancement. By following this multi-layered method—which involves preparing the image with controlled sharpness, adding a cinematic touch with chromatic and glow effects, and only then applying the Ultra HD upscaling—you ensure that even your oldest or lowest-quality content can compete in the high-definition visual universe.
This process demonstrates that, with the right tools and a deep understanding of how filters interact, it is possible to revitalize any material, delivering videos that are sharp, vibrant, and ready for the high standards of digital platforms.
Editor’s Note: The detailed method in this article uses advanced CapCut features. Should you encounter export barriers related to paid or premium features, the original content creator mentioned a previous tutorial on their channel that explains how to bypass these export limitations. For more details on the editing process, consult the original source:
Original Tutorial Source: https://www.youtube.com/watch?v=rprtQuI2iG8